New Synology
With the lockdown and working from home more often, I decided that my Synology (DS 116) was due for an upgrade. I wanted to retire one of my Raspberry Pi’s that was running my Pi Hole server and I wanted to have a play with some of the features on the higher end Synology’s - such as virtual machines and Docker, as well as make use of the BTRFS file system, so that meant getting one of the Intel Atom powered Synology devices.
My previous one was a single bay and I was at about 50% capacity, so I didn’t need to go overboard and get myself one of the four bays or larger, which meant I was looking at the two bays.
I’d been recommended the DS218+ but whilst I was looking, Synology released the DS220+, a slightly upgraded version of the 218+. Not a huge amount of difference between the two, but the DS220+ comes with a newer Intel CPU (Celeron J4025 compared to the Celeron J3355, which, whilst the same clock speed, has a higher boost, and achieves a higher benchmark score), as well as an additional LAN port. The price of the 218+ didn’t drop and as the 220+ was only £20 more, I ended up buying the newer one, hoping that it’s as good as it’s older sibling!
DS220+
Setting up a Synolgy is straight forward and easy, and the 220+ was no different to my previous attempts. The only difference I had this time around was that I had a dual drive NAS, but I’ve set it up as two separate drive pools. I’m pretty certain, by default, the Synology wants to use Synology Hybrid Raid (SHR). However, I didn’t want RAID on my device (I’ve got backups of all my important data) but wanted two separate disks. To this end, I only added the first drive, which would become my system drive, and then a second drive to act as a backup drive and overflow storage.
The drives are hot swappable, so I was able to get it set up with the first drive and then add the second one shortly afterwards.
Shucked Hard Drive
With a new unit, I also decided to upgrade and get a new hard drive1. My storage needs have slowly increased over the years but I still had about 50% of the 3TB drive left. However, I’d been reading /r/DataHoarder and the practise of shucking2 and also found a good deal on a Western Digital 8TB Elements drive at Amazon. At the price advertised, it was only slightly more expensive than a 6TB Western Digital Red NAS drive that I was looking at.
I therefore decided to take the plunge and ordered it to shuck3. It arrived and I ran my error checking software on it and ran it through HD Tune.
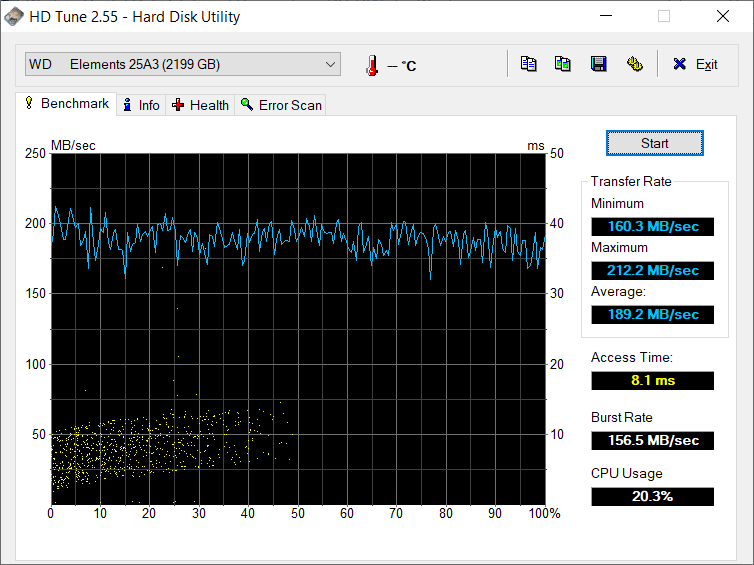
CrystalDiskMark was able to ID it, where HD Tune incorrectly identified it as a 2TB drive.
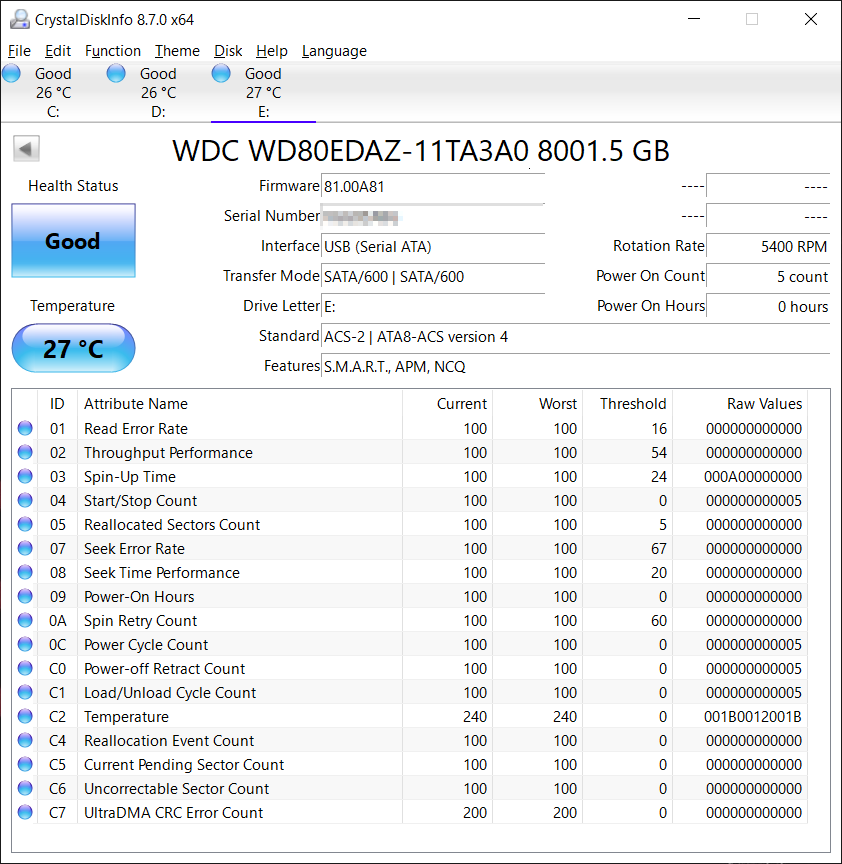
I was interested to see that I appear to have picked up one of the hard drives that appears to have raised another issue with Western Digital, where the drive is actually spinning at 7,2000 RPM, rather than the advertised 5,4000 RPM.
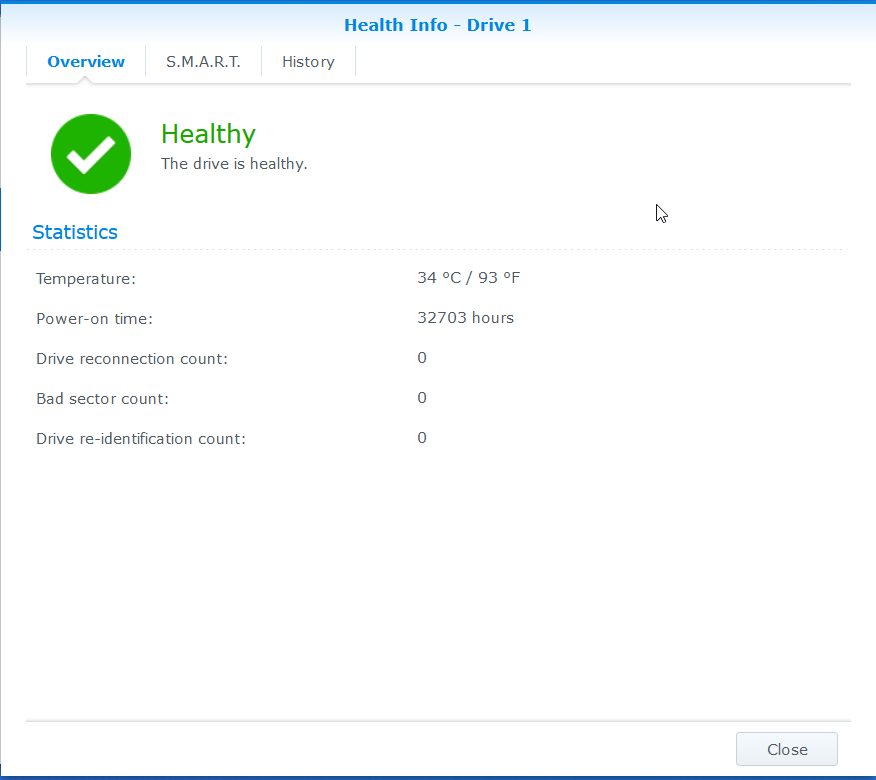
In my mind, I’m not to bothered - the drive passed all the error checking fine (I used the Western Digital Data Lifeguard program to do so, along with HD Tune), so I got the drive out of the box and installed within the NAS.
Synology picked the drive up fine and everything appears to be working nicely.
Data Migration
This is one of the tasks I perhaps could have done better. What I ended up doing was copying all the data to an external hard drive and then copying on to the new NAS once setup.
I could have looked at having both NAS devices running simultaneously and copy between the two, but I wanted to ensure that the data was being copied correctly.
I made use of Teracopy to do so. I copied from the old NAS to external and then from the external to the new NAS. It wasn’t the quickest method of doing things. Originally I’d planned to plug the hard drive in to the NAS and copy across that way, but that doesn’t perform any error checking.
However, once I’d managed to set the NAS up and place on the Gigabit switch upstairs along with the PC that was doing the copying, things flew. It was only about 1.5TB I needed to copy, but it was a lot faster when I realised that the initial data transfer had been taking place on WiFi! (30MB/s, compared to 110MB/s!)
Docker and Virtual Machine
Part of the reason I went for the DS220+ was the ability to run Docker and virtual machines. I hadn’t had any experience with Docker, so that was something new to me. However, I’ve used virtual machines in the past without issues.
I put a 4GB SODIMM RAM stick in to the NAS, as it comes with 2GB pre-installed. This would allow me to make use of the different software items I wanted to.
One of the main reasons to for the DS220+ was to replace my Pi Hole server. This would have worked nicely on a virtual machine, but I downloaded and installed it on the NAS using Docker - my first Docker container. The perk of this is that the system resources it needs is less than if I had a virtual Linux server running. This ended up being relatively straightforward once I found this guide on the internet. Following this guide, I was able to have Pi Hole and working within a few minutes. The only issue I ran in to was when things got messed up with the DHCP settings - I had been using my previous Raspberry Pi as the DHCP server as well, but something didn’t work this time round and everything broke. I ended up moving the DHCP server back to the router and then just directed all DNS requests to the Pi Hole. Everything now works, but all the requests at the Pi Hole appear to be the router, rather than each individual client.
My only issue now is that there perhaps seems to be a DNS loop, as Pi Hole has a number of DNS queries that don’t make sense - searching online just brings up the “Turn off Conditional Forwarding” which, is already off.
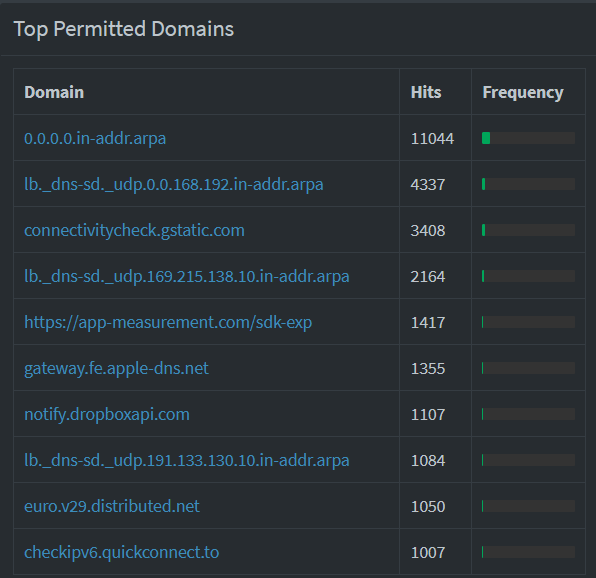
However, I set up another Pi Hole server using a virtual machine on the NAS - this worked with the DHCP server, but didn’t solve the 0.0.0.0.in-addr.arpa DNS lookup. However, with the DHCP server working, Pi Hole was able to tell me that it was the TV that spamming the network.
Conclusion
Overall, I’m happy with the purchase so far. It’s faster than the previoius model in all tasks, and I’ve been able to play around with Docker and the virtual machines which is a nice touch. We’ll continue to see how we get on, but at the minute, it’s working nicely.
-
The existing hard drive has been migrated and is the secondary drive in the NAS. ↩︎
-
The Backblze blog post a few years ago caught my eye initially, but /r/DataHoarders rekindled the interest more recently. ↩︎
-
I’d recently shucked an older WD Elements 4TB hard drive I had lying around, to replace a 3TB drive in my gaming rig, to give me more space for games, so I was confident I could shuck a drive without issues. ↩︎