Zim Journal Continued
Zim is a notebook type software - think Evernote or Onenote. However, it’s free and open source and saves data locally. It also saves all files as plain text, so you can access the files however and wherever you want.
I’ve been using it for a journal for a period of about three years now and I’ve written about it before. I did for a time switch back to Day One and tried the new syncing service, but when they had syncing issues earlier this year which exposed private data, I made sure I was back using Zim (syncing between my devices with Resilo Sync and stored on my own devices).
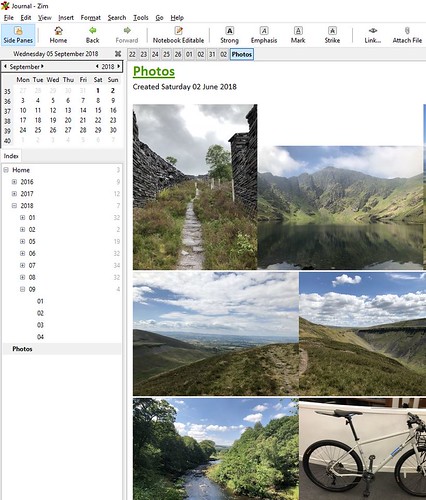
As a journal, it’s set up quite nicely, that I can instantly access todays page and start writing when I need to. However, I missed certain features of Day One, such as the photo page which displays all the photos that have been attached to posts. I wanted to replicate this in Zim, so I had to turn to some scripting to help out.
Batch File
Day One shows thumbnails of the images used and when you click the thumbnail, you go to the date in question where the photo was attached. Adding a photo to Zim is easy enough, and so is linking the photo to the date in question, it was simply the creation of the thumbnails that I needed, as I didn’t want the full size picture within my Photos folder.
This batch files sits on my desktop and allows me to drag and drop images on to the script to run and then it automatically saves the output to my desktop. I didn’t want the full size images within the Zim folder - I’ve got the full files saved in my Photos folder if I need it, but a larger version for the journal would be nice.
The first step renames the image - this isn’t strictly required, but I found that it made life easier as it removed all spaces from the image name if present).
The next step runs the images through the mogrify command of Imagemagick.
:: Relies on Imagemagick being installed
:: Set Random String to rename images to

set number=%RANDOM%

:: Resizes images to 1,228,800 pixels (1280x960, assuming a standard landscape iPhone image of 4032x3024 pixels)

magick %1 -resize 1228800@ -format jpg %UserProfile%\Desktop\%number%.jpg

:: Thumbnail creation - 76,800 pixels (320 x 240)

magick %1 -resize 76800@ -format jpg %UserProfile%\Desktop\Thumbnail_%number%.jpg
Once the images are created, I add the larger file in to the day that needs the photo and then I attach the thumbnail image in the Photos note and link it to the day, using the internal Zim linking (i.e. for a photo on the 6 August 2017, you would use Home:2017:08:06).
The end result is shown below. It’s not quite as nicely laid out as Day One - I couldn’t have images displayed within a table for some reason within Zim, otherwise, that would have sorted out the layout issues where a portrait and landscape image sit. However, it works well enough to achieve what I’m after.